NUS VPN First Aid Guide
Alrighty, I've been getting a number of requests lately about the darned NUS VPN so I've decided to put up a step-by-step instruction on how it do it up. Apparently NUS/ Cisco (I don't really know who) has written a client for the VPN so obtuse that up till now after more than 2 years with it I still haven't figured out how to change the darned password on it. Okay, I did it the last time round, but I really don't remember how I pulled it off anymore. Anyway, how is it that the policy of password renewal every 180 days can be implemented when something as simple as updating a password on the VPN is made impossible through an interface that is designed to obfuscate?
That aside, while surfing the NUS mac forums, I chanced upon a posting by someone in the Faculty of Science that has found that the MacOS 10.3 and above has the VPN function built natively into it (can we somehow make Steve Jobs some kind of living saint or something?) so we don't have to waste our time mucking about the Cisco VPN client. I can't really recall the link now, although when I do I'll put it here. So below I'll do my best and show you guys how to set up your mac with the built-in VPN and have a beautiful icon integrated into your menu bar as well (no more ugly VPN icon in the dock!).
STEP 1:

Launching the Internet Connect application, go to the "File" drop-down menu and select "New VPN Connection..."
STEP 2:

Once you're done, a window will (hopefully) appear (don't worry, it will. Afterall, this is not WinXP), and click on the PPTP radio button.
STEP 3:
<

Thereafter, select "Edit Configurations..." from the drop-down menu at "Connections".
STEP 4:
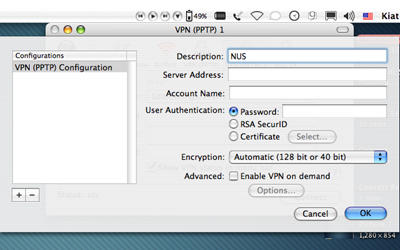
Give it a name. I suppose you can call it Brad or Tom or Angelina for all I care, as long as it makes sense to you. Boring ol' me chose to call it NUS.
STEP 5:

Type 137.132.3.176 as the server address. The alternative is 137.132.3.177 (only the last digit differs). I suggest for prudence once you've completed setting up for one address, create a second one for the alternative address as from time to time in the weekends NUS Computer Centre takes one of them down for maintenence. You can go ahead and call it Brad2 or Tom2, but I'm sure you're more creative than that. As a soon-to-be creative professional I have opted for NUS Alternative. Its taken by me guys, so come up with something of your own.
STEP 6:
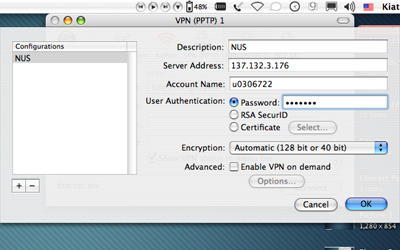
Bang in your NUSID without the nusstu\ and the corresponding password. No not mine. Yours. Don't blindly copy everything you see on screen.
STEP 7:

Of course I could say step 7 is technically "Click OK on your screen and you're done" but I assume you're more intelligent than that. So Step 7 is Click Connect and you're connected.
Okay, what I really meant to say is that if you notice the option to display VPN status in the menu bar, you can check it if it isn't already and connect elegantly to the VPN from the little VPN icon. You can choose to uncheck the option to display the time connected, unless you want to know how long you've been online surfing and whiling your life away.
Okay, hope this helps. If it doesn't, too bad. No MSN for you. You don't really need it anyway unless you stand no chance of getting onto the Dean's List anymore.
posted by kiat at 2:34 am
![]()

0 Comments:
Post a Comment
<< Home